 Source | Mike Aguilar
Many an old-time mechanic has painful memories of rusted bolts and studs that break when being removed. The worst of these were the exhaust manifold and header studs that were brittle from too many heating and cooling cycles. They broke far too often and easily, and usually required the removal of the head to get it out. Luckily, today's home mechanic trying to save a buck has a number of options that weren't available 20 or 30 years ago. We'll walk you through multiple methods of extraction, using tools you may already have at home or that are available at your local Advance store.
 Hanson 48 Piece Master Extraction Set | Advance Auto Parts
What you need for this project also depends on several factors. Sometimes you'll get lucky and some liberally applied rust penetrant, along with time for it to work, a heat source like a butane torch, and a pair locking pliers will get you by. There may be times you'll need more. Each section will provide a list of tools required to complete the extraction. Advance Auto Parts also has a kit with both types of extractors that will be used below.
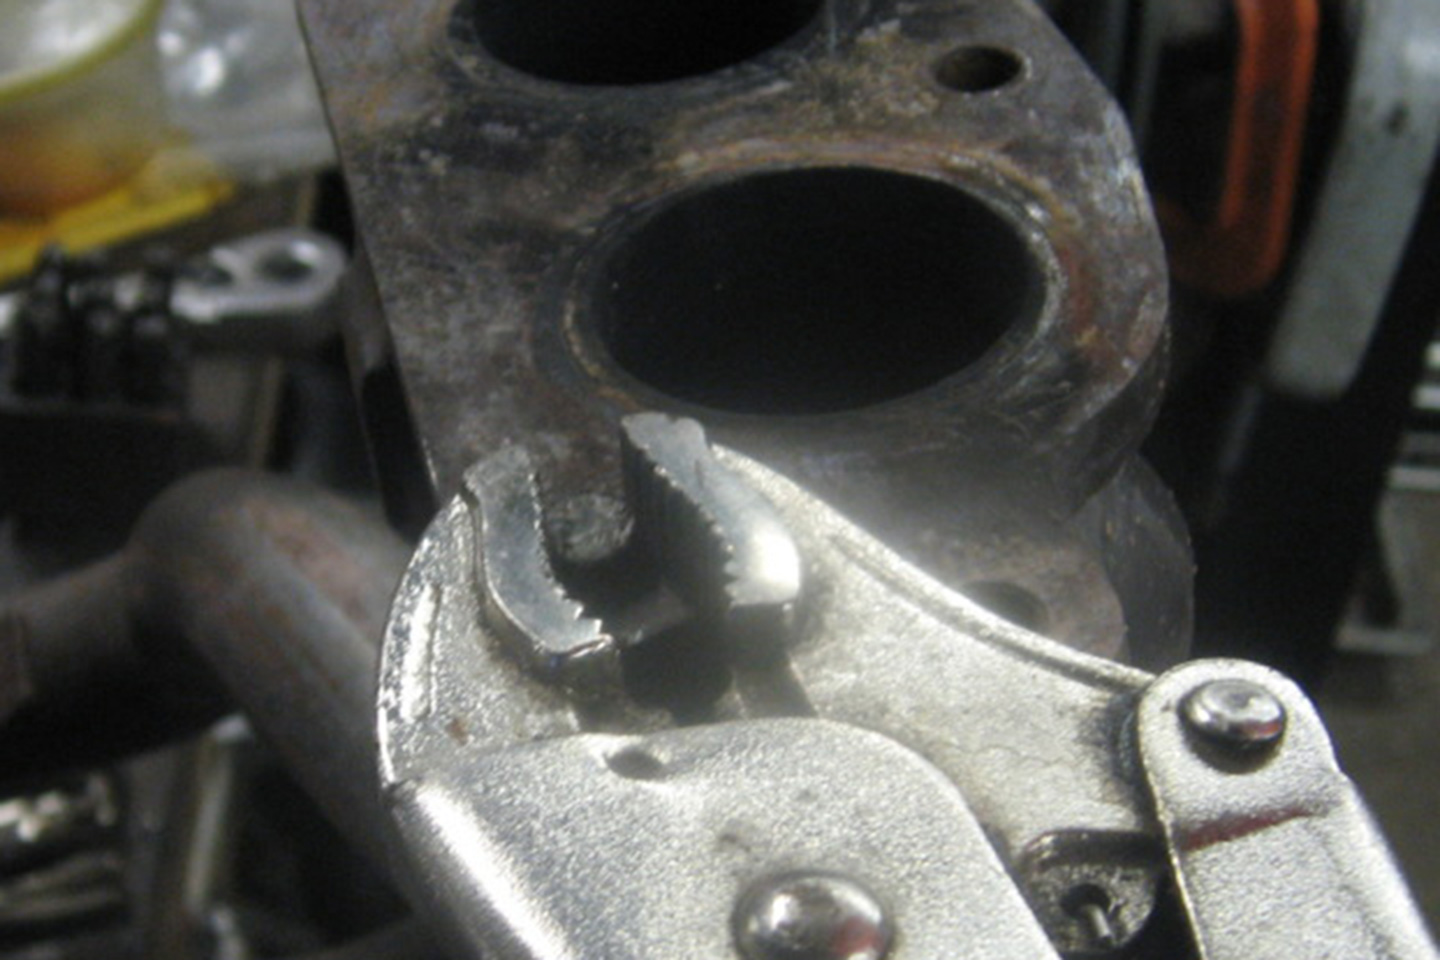
There are times when studs and bolts break in locations where you can't get a hammer or drill. In these instances, you're either going to have to hope that the extractor or a pair of locking pliers will work, but you're most likely going to need to remove the part from the vehicle. Exhaust manifold bolts are famous for this. You may also get lucky and have enough room to weld a bolt or nut to the end of the broken bolt or stud. If you can't get pliers, extractors, drills, or hammers into where the stud or bolt is broken, another option is to grind two opposing sides flat so they can be grabbed with a wrench.
Bolt or Stud Extractor for the Protruding Broken Stud/Bolt
 KD Tools Studs Camshaft Style Stud Remover ¼" to ¾" | Advance Auto Parts
Bolt/stud removers/extractors have evolved over the years from the cam-style extractor to multiple piece kits with a tool for each bolt size. Both work on the principle of using the gripping power created by counterclockwise torque on the tool to grip the broken part with enough force around as much of its diameter as possible to extract it. There must be enough of the broken stud/bolt protruding for the tool to grip it.
 Hanson 25 Piece Hex Head Multi-Spline Extractor Set | Advance Auto Parts
The cam-style extractor is used by turning the extractor to open the jaws enough to go onto the broken stud before being hand-tightened. Then a wrench or ratchet and socket are used to apply (hopefully) enough torque to remove the problem part without breaking it inside the head/block/etc. Choose the extractor that fits your broken bolt and twist it counterclockwise to get it started. Finish the extraction with a wrench or ratchet. Impact guns/drivers can also be used if they provide enough torque. Use ample quantities of penetrating oil.
Fluted Extractor for When It Breaks Too Close to Grip
 Irwin Spiral Flute EX-2 Screw Extractor 7/64" Carded | Advance Auto Parts
This is the method that's been around the longest. You'll need a drill, a set of drill bits, and the fluted extractor of the right size. Extraction is a three-step process.
- Drill into the broken stud to the specified depth using the drill bit that corresponds to the extractor size you'll be using. When drilling, let the drill bit do the work and don't force the bit. Also, use the appropriate speed on your drill for the bit selected. Using a lubricant/cutting fluid can help speed the drilling process and keep your bit and the work cool.
- Insert the extractor into the hole you just drilled by turning it counterclockwise. Continue turning the extractor counterclockwise with a wrench or ratchet and socket until the stud is removed. Straight and square flute extractors must be hammered into the hole drilled in the stud to remove the stud.
- It's recommended to “chase" the threads out with a tap before installing a new stud or bolt.
 Lisle Super Out Extractor Set | Advance Auto Parts
Just as when you're trying to rock a vehicle out of mud or snow, you want to reverse direction a little once you get the stud to move and also after each of the first two full revolutions before removing it completely. This is especially true with aluminum engine parts (intake manifolds, cylinder heads, blocks) so as not to destroy the threads.
You absolutely must drill the stud perfectly down the center or you will make it worse and have to skip to the last resort—the Heli-Coil, which will be discussed last. For the bolts that don't protrude far enough into the part for fluted extractors to grip, you can also use a splined extractor (pictured) that you'll need to tap into the bolt with a hammer. This hammering can also help loosen the broken bolt, especially with the liberal application of penetrant. Use a center punch to help keep the drill bit centered.
Hammering Can Break up Rust
That's right. It's hammer time. Without going overboard, give the part holding the broken bolt a few sharp raps with a hammer. You don't want to deform the metal; just vibrate it enough to break the rust loose. You can use two hammers on parts like exhaust pipe flanges where you can reach two sides of the part at the same time. Hold one hammer firmly against the part and sharply strike the other side of the part with the other hammer. This helps enhance the force applied with the hammer without deforming the metal.
Welding

Source | Mike Aguilar
This is where we begin to worry a little. However, if you can MIG or TIG (or even braze!), another bolt or a nut to the end of the broken stud the process of welding should transfer enough heat throughout the parts to allow you to remove the broken part once it cools down sufficiently. You will want to tack the nut or bolt to the stud and allow it to cool down before completely welding it. If you're welding a nut to the stud, you need to get your tacks and initial beads as deep into the nut as possible and work your way up to filling the nut completely with metal. Do this in steps, allowing the metal to cool between steps. Once cooled, the stud can be removed with a wrench as the welding process has most likely distorted the nut enough that a socket won't fit.

Source | Mike Aguilar
There are a few things that you need to ensure when you're using the welding method. The first is that you need to clean the broken stud and the surrounding area as well as possible to make sure the weld takes. Next, whether you're using a MIG or TIG, give yourself more stick-out than normal, especially when welding a nut to the stud to get as deep into the nut as possible. Use a new zinc-coated bolt unless you have no other alternative. Remove all the rust you can from the stud and nut prior to welding. Also clean where you place your grounding/positive clamp on the part, getting as much rust off it as possible so there's as much current transfer as possible.
Drill and Tap
 Source | Mike Aguilar
This method requires you to accurately measure the diameter and depth of the hole in which the stud is broken. You need to choose the drill bit, which removes the stud or bolt but leaves its threads. These are then removed by running a tap in and out of the hole several times, keeping the drill and tap well lubricated the whole time. If the drill size you choose is even a little too big you'll eat the threads in the head, block, etc., and have to go one size larger in diameter.
Heli-Coil
 Source | Mike Aguilar
If none of the above methods work, there's always the last resort: the Heli-Coil. This method replaces the threads after drilling out the broken stud. Using Heli-Coils usually requires removing the part to ensure that you drill and thread the “new" hole perfectly straight. You also don't want any chips entering the engine.
 Heli-Coil Metric Fine Thread Repair Kit, Thread Size M12X1.5, Length 18.0 mm | Advance Auto Parts 1. Refer to the instruction with the kit and drill the broken stud out with the specified bit to the specified depth.2. Thread this hole to the proper depth using the specified tap.3. Twist the Heli-Coil insert onto the tool until the tab at the bottom licks into the tool.4. Thread the insert into the bottom of the hole, giving it one final twist to break the tab at the bottom. Remove that tab. The tab is notched at the base to allow it to break easily, but sometimes you may need to convince it with a small punch or screwdriver after removing the insertion tool. The insert must be inserted until about half a thread below the surface of the head and be at least half the depth of the hole.
Heli-Coils may also be a first option when the stud breaks inside the hole. It's not protruding from the part; it's actually recessed in the part. You might get lucky with a fluted or splined bolt extractor, but you're most likely going to have to default to a Heli-Coil repair. Heli-Coil also makes repair kits for spark plug holes. However, it's recommended to remove the head(s) first to keep the shavings out of the cylinder.
 Heli-Coil Metric Coarse Master Thread Repair Kit | Advance Auto Parts
Heli-Coils are usually sold as just a handful of the inserts of a single thread size and different lengths and the installation tool. They're also available with the drill bit for that size as well as kits that also have the right tap. These kits run up to about $70 and have enough inserts for several repairs of that one size. There are also master kits that will allow you to make several repairs of several different sizes. These kits cost between $200 and $400 and are available in metric and standard and fine and coarse pitches.
Heat

Source | Mike Aguilar
There may be times when the methods described above alone won't work and you need a little more help in breaking the grip of rust. This is where heat can help. Heat the area around the broken stud with a torch (MAP gas, propane, butane, acetylene) and apply torque to the extraction tool. You don't want to apply enough heat to make the material soft, just enough to expand it and help break the rust.
A Final Option for Small Bolts/Screws
Most of the methods described above work great for bolts/studs that are 1/4 inch in diameter and larger. Smaller bolts/studs that you have top-down access to can have a slot cut into them with a Dremel and small cutting wheel to allow you to use a screwdriver to remove the offending part. You have to have clear access to the end of the broken screw/bolt/stud and at least 1/4 inch needs to be protruding to give you enough "meat" to bite/cut into and to keep from weakening the part to the point that trying to remove it breaks it again but inside the part it's stuck in.
Do you have experience with removing broken bolts or studs? We want to hear from you! Leave us a comment with your horror stories or helpful hints below.


