Source | Flickr
Why you should replace coil springs
Coil springs expand and contract countless times whenever a vehicle is driven, absorbing the bumps and turns encountered along the way. They work along with the shock absorbers, soaking up bumps and roughness while the shock absorbers limit up-and-down movement. Over time, though, coil springs eventually wear out from old-fashioned metal fatigue. When they do, the vehicle tends to sag, droop, and handle poorly. Changing your coil springs can restore the vehicle's suspension and significantly improve vehicle ride, handling, and safety. Standard practices include replacing coil springs in pairs, and also replacing the shocks at the same time. Before starting this project, you should also check the spring insulator pads, which may also be worn out.
There are two basic suspension types make use of coil springs. This article will only address suspensions, both front and rear, that utilize control arms and separate shock absorbers and coil springs.
Caution
This is a potentially dangerous project. Careless handling of coil springs, especially under tension, can cause serious damage to the vehicle, property, and you. Use the proper spring compressor for the vehicle and suspension type you have. Many old school mechanics keep a 1/4 inch "safety chain" handy in case the compressor tool fails.
This is a challenging and technical project
-
Loosen the lug nuts, then raise the front of the vehicle using a jack. Secure it with jack stands, and then remove the lug nuts and wheels.
-
Remove the brake caliper. Calipers may be secured to the vehicle with one of several types of bolts, so inspect them before starting to be sure you have the right tools. Support the calipers from the frame using a bungee cord or wire—don't let them dangle from the brake line.

Source | Mike Aguilar
-
Remove the tie rod ends and sway bar end links. The nuts and bolts on sway bar links are usually either 1/2 or 9/16 inch. You will need a ratchet and socket or a wrench on both to remove them. Remove the rubber spacers and washers from the control arms and replace them on the bar ends so they don't get lost.

Source | Mike Aguilar
-
Use pliers or side cutters to straighten and remove the cotter pins from the tie rod ends. Loosen the castle nuts on the tie rod ends until flush with the end of the threads. Use the tie rod/ball joint separator tool to pop the tie rod loose, finish removing the nut, and allow the tie rod to droop. Alternatively, you can often remove tie rods by smacking the steering knuckle with a large hammer. Thread the nut back onto the tie rod so it doesn't get lost.

Source | Mike Aguilar
-
Remove the front shocks. Exactly how this is accomplished will depend on your vehicle. Most older vehicle shocks will have two bolts on the bottom and one on the top. Unless you have power tools, you may have to use an adjustable wrench to hold the square top of the shock rod as you loosen the nut with an inset wrench.

Source | Mike Aguilar
-
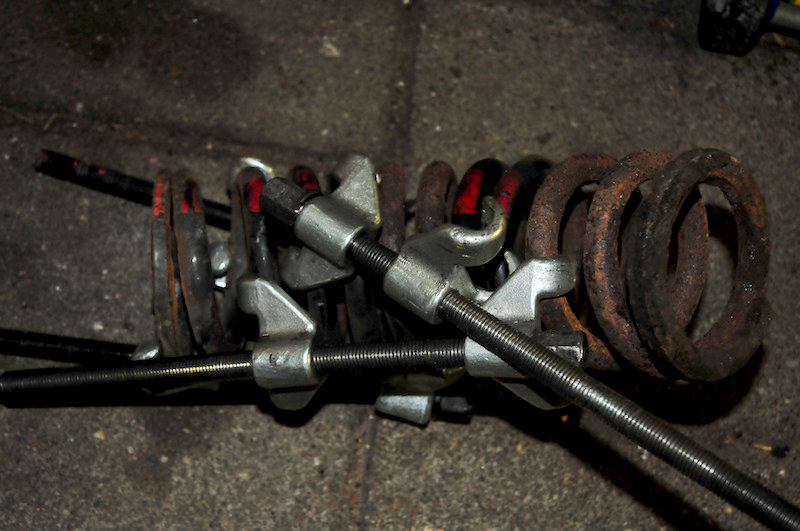
Compress the coil spring. Make sure that the coil compresses evenly, or you will stress the compressor and possibly break it. This would then release the incredible energy stored in the coil, possibly causing severe damage or personal injury. You should be able to move the spring around some, but not remove it yet.

Source | Mike Aguilar
-
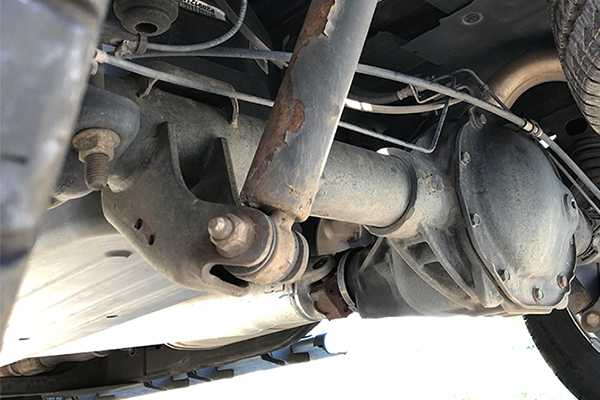
Place your jack under the ball joint and raise the jack enough to just provide some support to the control arm. Remove the ball joints. This is another instance where the exact steps will vary depending on what type of vehicle you have. The image above shows the front end of a Mercedes on the left and a typical GM F-body front end on the right.
You will need to remove a cotter pin before removing the nut in most cases. With the cotter pin removed, loosen the castle nut until flush with the end of the ball joint stud and use a hammer or ball joint tool to pop the ball joint stud loose. Carefully review this procedure in your vehicle-specific repair manual. On some cars you will need to remove the upper ball joint, others will have the lower coming out. Still others may ask you to remove both—it all depends on the suspension design.
If you're extremely careful or will also be replacing the ball joints, you can use a pickle fork (available from the Advance Auto Parts Loaner Tool Program) to separate the ball joints. This isn't recommended if you want to reuse the ball joints as the pickle fork usually rips the boots.

Source | Mike Aguilar
-
Double check to ensure the coil spring is sufficiently compressed and secure in the tool. Remove the ball joint nut and slowly lower the jack to allow the control arm to droop. Remove the coil spring. You may need to push or pry down on the control arm to do so.
-
Remove the old coil from the compressor and compress the new spring. Install the new spring in its pocket, making sure both upper and lower “tails" are properly seated. Lift the lower control arm with the jack and reinsert the ball joint stud into the steering knuckle and secure it with the nut. Remove the jack once the ball joint is secure.
-
Reinstall the tie rods, shock absorbers, and sway bar links and torque the nuts to specifications in the repair manual. If the holes for the cotter pins don't line up, tighten the nut a small amount until the holes line up—never loosen the nut to insert the cotter pin. Bend the cotter pin around the nut to lock it in place.
-
Reinstall the tires and lower the vehicle, torque the lug nuts, and get an alignment.
-
Loosen the lug nuts and raise the vehicle. Remove the lug nuts and wheels. Place the jack under the end of axle housing and lift it enough to support that end of the axle. If your vehicle has ABS, remove the sensor wire from the clips so it isn't damaged.
-
Remove the rear shocks. Again, the exact procedure involved will depend on your vehicle. The rear shocks on most cars are secured at the bottom (to the differential/axle tube) with a single bolt and one or two up top, sometimes in the trunk or hatch area. Only the lower mount needs to be disconnected. Allow the shock to hang.

Source | Mike Aguilar
-
Compress the coil spring. You will need the external-type of compressor on most cars, as the lower spring perch isn't big enough for the internal type to slip through. Again, make sure the coil compresses evenly.

Source | Mike Aguilar
-
Remove the rear sway bar links (if equipped) and lower control arm nut and bolt (independent rear suspensions).
-
Push down on the control arm or end of the axle and remove the old coil spring, decompress it (evenly!) and install the compressor on the new spring, compressing it evenly. Install the new spring and raise the jack to reconnect the suspension components you loosened or removed above.
-
Torque all the bolts you removed or loosened previously to the specification in the manual and reinstall the wheels. Re-torque the wheels once you've lowered the vehicle.
Get an alignment.

S&G Tool Aid Single Action Coil Spring Compressor Kit | Advance Auto Parts

Caution
When using a coil spring compressor - especially the two-piece kind - be sure the coils are evenly compressed or the tool can be damaged, allowing the coil to spring loose.
The process described below is extremely generic. Refer to your vehicle-specific repair manual for the exact procedure for your vehicle.
If your car is lowered, you may not need a spring compressor as removing the bolt from the rear shock will allow the suspension to “sag" enough to remove the spring or only require you to push down on the suspension to remove the coil.
Some projects may be too challenging or time consuming to tackle at home, and that’s why we partner with trusted, professional shops that are ready to get you back on the road. Use our directory to find a qualified technician near you.