Do you have intermittent spark and a "check engine" light for the ignition coil or misfire? We can help you with that. Multiple ignition coil packs look intimidating for those used to the traditional distributor and single coil, but they are just as easy to replace.
How a coil pack works
Beginning in the '90s, most manufacturers did away with a mechanical distributor and plug wires and instead managed timing and spark with the engine computer and an individual coil-on-plug (COP) or coil pack.
The ignition coils provide the spark that fires each of the spark plugs in an engine. It is either linked to the plugs via spark plug cables, or each coil is directly connected on top of each spark plug—the latter style called a coil-on-plug (COP) or coil pack. A coil pack is typically a set of coils all in one unit that can provide spark to each spark plug wire, while coil-on-plug systems would be one individual coil over each spark plug. The ignition coil fires at exactly the right time because the crankshaft position sensor reports the crank position and speed to the PCM, which determines which plug should fire next and when, and transmits a signal to the appropriate coil.
Knowing how it works, you can probably see the need for occasional ignition system maintenance; otherwise more parts will start to break. For example, a failing spark plug cable will have a much higher than normal resistance. This higher resistance causes a higher amount of voltage to be produced by your ignition coil's secondary winding, causing it to break down prematurely. Another problem is water. Ford 4.6L and Triton V8s commonly suffer from premature coil failure, usually caused by moisture issues. This could potentially happen to any engine, so when changing an ignition coil, don't forget to add dielectric grease to the boot.
Bad ignition coil symptoms
When your coil starts to fail, your first sign is probably a "check engine" light and a misfire trouble code for a cylinder. Since ignition coils supply power to the spark plugs, a faulty coil can cause symptoms that may seem spark-plug related, so have the code read to narrow down the issue. If you are just getting a general misfire code, it's worth a shot to replace the plugs first if they are due, as a full set is very affordable maintenance.
If your issue is not the spark plugs and you ignore the "check engine" light, the coil will further degrade, causing engine misfires, rough idling, and poor acceleration. You may also notice the vehicle is harder to start. If it gets really worn out, you may start noticing backfires or rough bucking and jerking while accelerating. Don't keep driving it, as the symptoms won't go away, and you'll be putting stress on other engine components. An ignition-related misfire, for instance, would mean fuel is getting into the exhaust and would destroy a catalytic converter. Here's how to fix a broken coil pack.
This is a good project for new DIYers
-
Remove the negative battery cable.
-
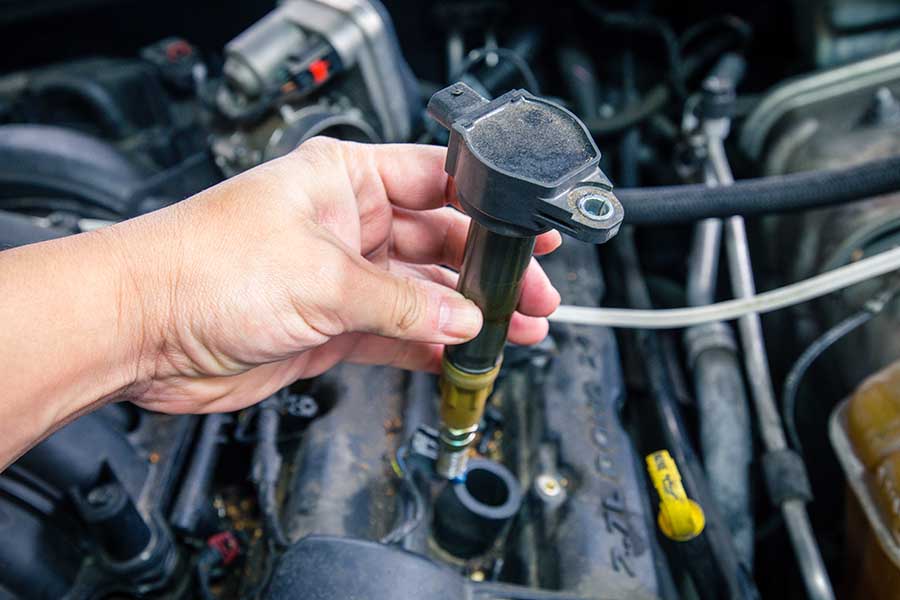
Locate coil packs or ignition coil in the engine bay. If your car has a distributor, follow the wire that is in the center of the distributor cap to find the igniton coil. Cars with coil packs usually have them mounted near a valve cover. Coil on plug ignition coils are typically placed near or directly over each spark plug. Remove any plastic engine covers or air intake tubes to gain access to the coils.
-
Unplug the wiring harness by pushing the tab and pulling off the electrical connector.
-
Remove the retaining bolts holding the coil in place. Once unbolted, the coil pack can be easily pulled out of the engine now, but be aware that some models have a locking tab that needs to be opened.
-
If it is time to change the spark plugs, do that now.
-
Apply dielectric grease inside the end of the coil-on-plug style, as this prevents the boot from sticking to the spark plug and helps keep water out of the connection.
-
Slide the coil into place, pressing firmly so the boot clicks onto the spark plug. Reattach the electrical connection and the coil pack retaining bolt.
-
Proceed to the next coil pack until all units have been replaced. Finally, reconnect the negative battery cable.
If you have a coil pack, label the spark plug cables with masking tape and assign each a number. Once the replacement coil is in place, you can correctly reattach all the cables. If you have room, you can also remove the spark plug wires and attach one at a time to the new coil pack. Once all wires have been transferred, you can unbolt the old coil pack and install the new.