Source | Advance Auto Parts
Here's how to replace spark plugs
To some, a car's engine may seem like an impossibly complicated hunk of mystical machinery. While that's not too far from the truth for many modern engines, there are still some easily serviceable items on even the most high-tech cars. Spark plugs especially are among the easiest parts to replace in any internal combustion engine. All it requires is carefully following some basic steps and a handful of basic tools.
Before we dive into the step-by-step process, you might be wondering how often you need to change your spark plugs, what sort of spark plugs you should use or whether you need to upgrade your spark-plug wires (if your engine has them). Fortunately, these questions are easy to answer. And don't forget, you may need to replace your spark plug wires every time you change your spark plugs depending on your driving style.
But chances are, if you're here, it's because you know it's time to change your spark plugs. So let's get started.
This is a good project for new DIYers
This is a project that needs some know-how
-
Once you've gathered all of the tools you need, as well as the correct spark plugs for your car and spark plug wires (if necessary), you may want to drape an old blanket or towel over the fenders of your car so that you won't mar the paint as you lean into the engine bay. It's also good practice to disconnect the negative terminal of your car battery when working on anything electrical.
-
Thoroughly clean the area around your spark plugs. Once you remove the spark plug, you'll have an open hole directly into the inside of your engine, and any dirt or debris around the spark plug can fall straight in and cause serious wear or damage to your engine — something that should be avoided, for obvious reasons.
You can use compressed air to blow the area clean and/or a cleaner/degreaser spray and shop towels to loosen and remove any gunk around the spark plug. Be sure to wear eye protection if you're using compressed air or a spray cleaner.
Once you have the area around each spark plug clear of any oil, dirt or other debris, it's time to start the actual replacement process.
Remove debris such as leaves before working to prevent internal engine damage after pulling spark plugs.
-
If you have spark plug wires, keep everything in order by removing a single spark plug wire from one spark plug at a time. This prevents you from reconnecting the wrong wire to the wrong plug when it's time to button everything back up.
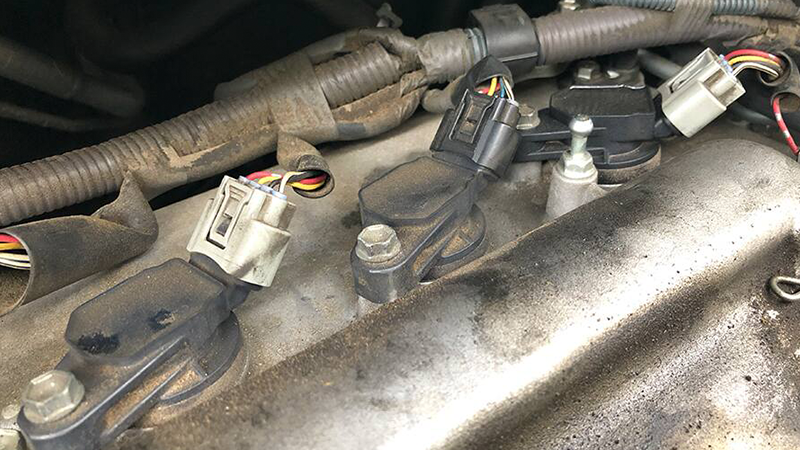
If you have a coil-on-plug (COP) system with no spark plug wires, simply disconnect the coils and set them aside in a safe, out-of-the-way location. Ignition coils are often secured to the cylinder head cover with one bolt, often a 10 mm. Magnetic trays are a great way to keep track of these bolts, which have a tendency to get sucked into the black holes in the engine compartment.

-
Fit the necessary combination of extensions and swivels to the spark-plug socket to comfortably fit the tool to the spark plug.
Turn the spark plug counterclockwise until it comes free.
Even though you cleaned around the spark plug thoroughly before beginning, take care not to knock any previously unseen debris into the now-open hole of your engine's interior.
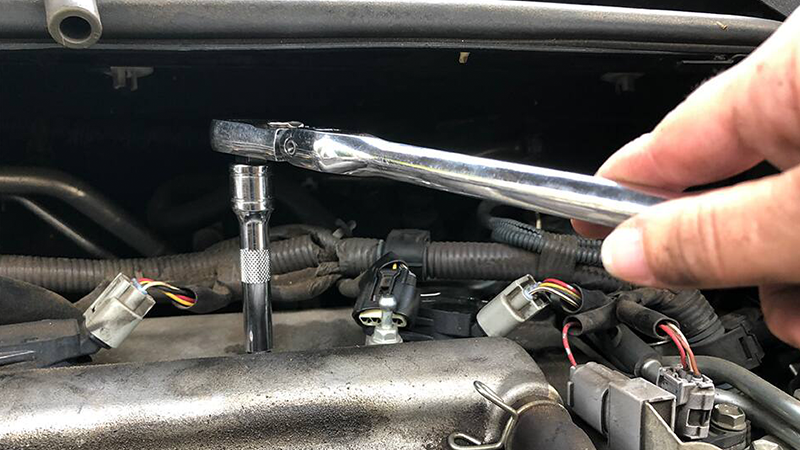
Sometimes it takes trial and error to find the best combination of sockets, extension and type of ratchet to reach each spark plug.
-
Modern spark plugs come properly gapped from the factory, but shipping and handling can result in this small, but crucial gap being tweaked. Using a spark plug gap tool is a good idea to ensure the gap is correct before installing.
If any adjustment is needed, gently open or close the gap until the tool just fits at the correct gap (which should be specified in your owner's manual).
-
With the gap verified, carefully insert the plug into the open hole by hand. If recommended by the manufacturer you can rub a small drop of anti-seize lubricant on the spark plug thread so it doesn't lock up from the heat. Gently start screwing the plug in with a clockwise rotation, ensuring the threads are properly mated.
Using hand tools, tighten each plug to spec. If you don't have access to the manufacturer's specification, torque specs are usually between 7 to 15 lb. ft. for 14 mm threads. Or, a general rule of thumb is to give no more than an additional quarter turn after hand tightening.
-
With the spark plug securely re-installed, reattach the plug wire or insert the ignition coil.
To reattach the plug wire, twist slightly as you push the boot back down onto the exposed tip of the plug until you hear and feel a firm click. That means you've properly seated the plug wire. You can put a drop of dielectric grease inside the plug boot for better heat dissipation.
-
Repeat the process in Steps 2 through 7 for each of your remaining spark plugs until you've replaced them all. If you're also replacing your spark plug wires, go back and do each one in the same order, one at a time. You'll notice that the spark plug wires vary in length according to their proper installation position, so be sure to match each wire up to the existing wire before removing the old one and replacing with the new wire. Repeat until all the wires are replaced.
You're done! Before you celebrate, however, be sure to mark down the car's current mileage in your maintenance notebook so you'll know when you need to change your spark plugs again.
Be sure to let your car's engine cool thoroughly before replacing your spark plugs. This will make removal of the plugs and the spark plug wire or ignition coil boot easier.

Ignition coil connector tabs become brittle and fragile with age. To avoid snapping them off, use a pick to gently pry up on the tab while you pull the connector off of the coil.
Don't thread in the new plugs with power tools. You risk over-tightening them, and the vibrations from the tool can also cause hairline fractures in the plug's delicate porcelain. You may not be able to see the fractures, but they will still hurt performance.