When cold weather or the rainy season beckons, it's time to put that Jeep hardtop back in place. If it's been months—or years—since you've maneuvered this process, rest assured—it's pretty simple if you have a set of helping hands or a hoist in place to assist with the lifting. Then it's just a few screws, latches and plugs to secure the roof portions of your sport utility vehicle.

Source | Bull-Doser
Note: This guide is specific to a Jeep with two front panels and one rear continuous hardtop piece, including the two-door Jeep Wrangler JK manufactured in 2008. Start at page 126 of the Jeep owner's manual for additional guidance.
This is a good project for new DIYers
-
Drive the vehicle beneath the hoist where the hard top is secured. If the top is not suspended in a hoist, move the vehicle to an open space where you can freely move around to lift the piece into position. Have the Torx screws that came with the hardtop accessible.
-
Lower the hardtop over the rear cargo area slowly, inline with the screw holes on the tops of the sides of the vehicle. While hovering about a half-inch above the body of the vehicle, place the Torx screws in the holes, then gently finish lowering the hardtop, being mindful of the screws/holes alignment.
-
Hand-tighten the Torx screws (there may be four to six, depending on the model of Jeep). Then use a screwdriver or a Torx ratcheting socket wrench set that can be stowed in the rear cargo area to finish securing the connections. Do not over tighten, or you may strip the screws.
-
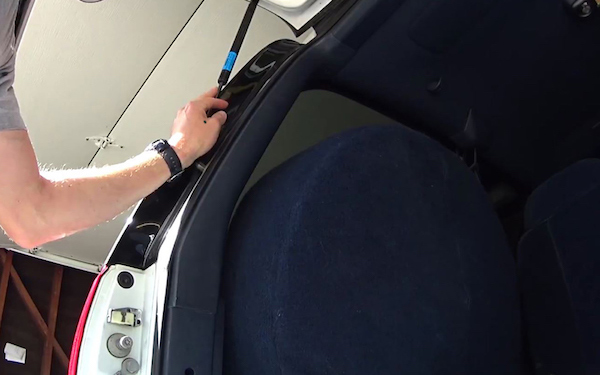
Open the rear window and swing the tailgate open to gain access to the rear interior of the vehicle. Reconnect the washer hose and electrical wiring harness assembly, located together on the inside of the hardtop's driver's side rear wall. You'll hear a click when the two rectangular wiring pieces plug into one another. For the washer hose, you will need to gently remove the storage cap, let it dangle (see photo), then slide the hose into the receiving end that's secured to the hardtop wall.
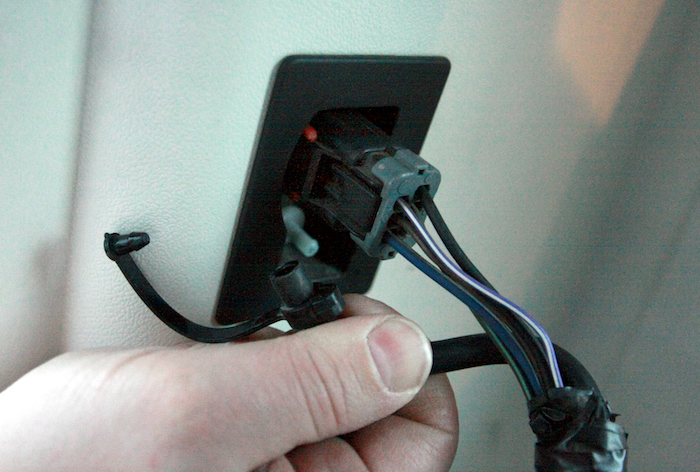
Source | Angela Tague
-
Move to the front of the vehicle with the passenger roof panel in hand. Lift it to the top of the Jeep and position the panel so the front (possibly marked with a locating pin) rests on the windshield frame without overhanging and lies flush with the body. A black header panel latch will face the front of the vehicle and rest just above the windshield. Repeat this step with the driver's side roof panel.
-
Close the header panel latches. There is one located on each roof panel (for a total of two). Gently push down until you hear them click into the stationary metal bars secured above the front windshield.
-
Push the L-shaped lock latches into place while sitting in the driver or passenger seats so they overlap the roof panels. The locks are located on the interior of the roof panels in the center and above the shoulder belt assemblies. The number of latches depends on your model of vehicle, so consult your owner's manual if you're unsure where they are located or how many you have.
-
Look up to find two large, round recessed areas on the ceiling near the speakers and interior cabin light. This is where you will install the fastener knobs, which screw in clockwise by hand tightening. And that's it! Your Jeep hardtop is now re-installed and ready for all-weather travel.
Some Jeep models have locating pins on the side bars to help with hardtop alignment.
The passenger roof panel must be installed before the driver's side roof panel to ensure a secure, water-tight seal.
Sometimes things don't go quite according to plan. Here are a few common issues that can arise when replacing the hardtop on your Jeep, and how to fix the issues quickly.
Problem: You notice rain or moisture seeping into the vehicle through the roof.
The Fix: Inspect the spongy hardtop weather-stripping seals around the perimeter of the removable panels. If you see cracks, tears, or missing sections, it's time to replace these essential moisture barriers to eliminate leaks from coming into the cabin of the Jeep.
Problem: Windshield washer fluid is getting the interior rear cargo area of your Jeep wet.
The Fix: Double check the washer hose. Was it attached completely? Did it come undone and leak fluid? If everything is secure, inspect the line for a crack or hole. If damage is found, this tubing will need to be replaced.
Problem: Your rear windshield defrost and rear windshield wiper aren't functioning on your Jeep.
The Fix: Make sure the rear electrical assembly was reattached after positioning the hardtop. Review Step 4. If the parts are already joined, disconnect them, clean the contact points with electrical contact cleaner, then reconnect the assembly.
Problem: So, you accidentally scratched your fender or door during this process. Don't let those spots get rusty.
The Fix: Use a small bottle of liquid touchup paint to seal the area and restore color. If it's a superficial scratch, go after it with rubbing compound.
We'd love to learn more about your Jeep. Tell us in the comments below why you love cruising with the top off and where your adventures have taken you.
