
Source | Wikimedia Commons/LA2
Towing puts extra strain on your transmission, which causes extra heat. Extend your transmission's life by installing an external transmission cooler.
Summer's here and that means a trip to the lake or a campground. Either way it means towing either your boat or your trailer. Summer heat is hard enough on an automatic transmission. Add a boat trailer or camper trailer and you're taking your transmission out of the frying pan and throwing it in the fire.
This is a project that needs some know-how
-
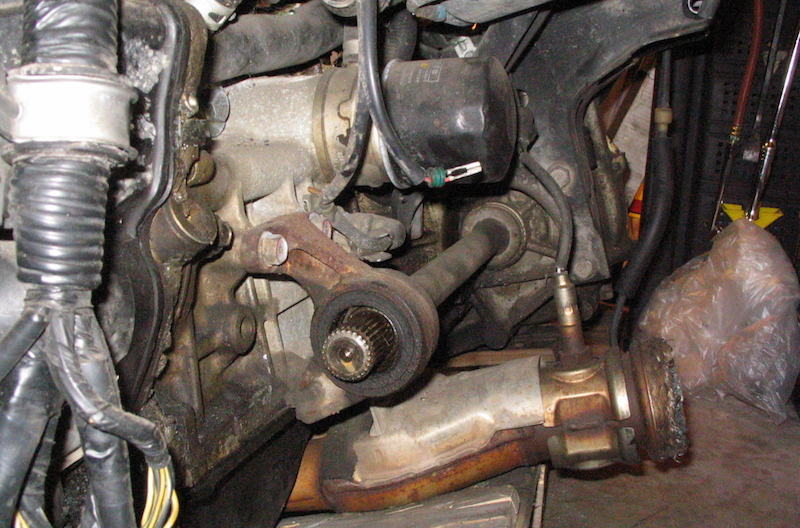
If you're planning on bypassing the cooler inside the radiator, you can skip this step. If you plan to use an external cooler to augment the cooler inside the radiator, you need to determine flow direction first. The recommended method to determine flow direction is to allow a cold transmission to warm up at idle for a few minutes as you feel the cooler lines. The line that heats up most quickly is the supply.

Flow direction is important to know when installing to augment the existing cooler. Source | Mike Aguilar
-
Put the transmission in park and firmly set the parking brake. Raise and support the vehicle with jack stands under the frame rails behind the front wheels.
-
Remove covers and skid plates as needed to access the transmission cooler lines.
-
Slide under the vehicle and locate the transmission cooler lines coming from the side of the transmission up to the radiator. Decide where you wish to splice into the cooling lines to install the cooler. Cutting the hard lines near the radiator means the hose you will need to install can be shorter. Keep in mind, however, that any obstructions in those hard lines will remain and diminish cooling efficiency unless you flush them out.
-
Find a suitable location in front of the radiator where the new external cooler will fit between the radiator and grille. Attach the cooler per the instructions. This may entail using sheet metal screws through the radiator support, or it may be as simple as pushing a notched rod of plastic through the radiator and cooler and running a slip nut down the plastic rod.

Mounting a transmission cooler on a Honda Pilot. Source | Mike Aguilar
-
Use the tubing cutter to cut the required cooling lines. If augmenting the original cooler, only the return line needs to be cut. Cut both lines if you're bypassing it.

Source | Mike Aguilar
-
Route and measure the hose between the new cooler, the cooler hard line(s), and the radiator return port if you're installing the new cooler between the radiator and the transmission. Make sure you avoid pinch points, sharp edges, and hot items like exhaust pipes.
-
Secure the hoses to the cooler fittings and lines per the instructions with the kit. Most of these connections will have you slide the cooler hoses over the nipples on the cooler and the pipe ends and use clamps to secure them in place.

Source | Mike Aguilar
-
Refill the transmission with the correct transmission fluid and check for leaks. The fluid temperature at which the fluid level should be checked varies by manufacturer, so be sure to follow your owner's manual. Verify the fluid level and top it off as needed without overfilling. Run the transmission through the gears for a few minutes and recheck the fluid level.

Source | Mike Aguilar
-
Replace the grille and any covers or plates that had to be removed to complete the installation.
An automatic transmission's optimal thermal operating range is between 130° and 200°. If it hits 250° and stays there for any length of time, you're just asking for a transmission failure. Repeated heat cycles over 230° will burn the transmission fluid, which breaks it down and will result in slippage. This causes more overheating and further degrades transmission life. If you suspect you've been running your transmission too hot, just pull the dipstick and check the fluid. The fluid should be a translucent magenta color, but burned fluid will be darker and brownish with a distinctive burnt-toast smell.
Transmission specialists say that reducing the normal operating temperature range of your transmission just 20° to 30° can extend its life by as much as a third.
It may sound obvious, but one of the biggest things you can do if you're towing is to remember you're towing, and not try and be the fastest car on the highway. Keep your usage of overdrive to a minimum and refrain from passing on uphill grades. Wait for the downhill grade to pass that semi. Turn off overdrive or turn on the towing feature if your vehicle is so equipped.

Advance Auto Parts carries universal fit transmission coolers.
Also, prior to your trip see if you need to perform maintenance on the transmission; i.e. changing the fluid. Check the fluid on the dipstick. If it's not a nice red color and/or smells like something got burnt, you should change the fluid and then install an external cooler.
Over time, the stock cooler can either become less efficient or stop working altogether. An external transmission cooler can maintain or even enhance your vehicle's ability to keep the transmission in the optimal operating range. They're indispensable if you're going to be towing any sort of trailer or climbing hills on a regular basis.
An external oil cooler can be used to either replace or augment the original cooler. When replacing the original cooler, fluid flow doesn't matter and you can simply cut both lines and route them to the new cooler. You'll notice that the cooler looks a lot like a radiator. That's because it works the exact same way as a radiator does, by circulating the hot fluid through copper loops and allowing it to dissipate the heat to ambient air through fine aluminum fins.
However, if you're going to augment the original cooler, you need to know which line is supply and which is return, because you want to allow the fluid to go through the original cooler first and then go through the external cooler. Otherwise you will be warming the fluid after cooling it by passing it through the hot radiator after the cooler.

My father's 2017 Toyota Tacoma already had a cooler external to the radiator, shown below the arrow, but he wanted to give it some help. Like the Tacoma, you may need to remove quite a bit of the front end to begin installing the cooler. Often grilles and front fascia have some small and delicate connectors—be sure to not damage or lose them.
There are a number of external transmission cooler types. The type and mounting method you use will be determined by what options your vehicle allows you. Take a look at your car or truck and decide which type of cooler is best for you before heading to Advance.
Trans coolers come in a variety of sizes and designs. Some of the coolers that Advance Auto Parts sells are direct replacements of factory coolers, while others are aftermarket items. If you're buying an aftermarket cooler, there are a few things you need to keep in mind when making your selection, especially if you're going to bypass a cooler that is inside the radiator. You don't want to do this and install a transmission cooler that's too small for your vehicle's needs.
Is the cooler being installed in a daily driver that sits in traffic for an hour or more every day? If so, you might want to look at a medium-sized cooler. If you drive an F-350 or a Ram 3500 that often tows a trailer of 10,000 pounds while carrying a load of 3000 pounds, you're going to want one of the largest aftermarket external transmission oil coolers that Advance carries. On the other hand, if the vehicle in question is a sedan that spends most of its time at highway speeds, a smaller cooler will do the job.
When it's time to start disconnecting lines, be sure to use those flare-nut wrenches. The brass or aluminum nuts used for these fittings are extremely soft and easy to round off with a conventional wrench. With more points of contact on the connector, the flare-nut wrench provides a more secure grip and won't damage soft metal surfaces.
Some kits will come with plumbing parts that eliminate the need to cut the cooler hard line. These kits come with fittings that allow the original cooler to be bypassed or connected in-line with the new cooler.
Some people will tell you to put a little Teflon tape on threaded fittings, as it makes a great thread dressing for many applications. Don't. Ever. Do. That. Over time, small pieces of the Teflon will break off and enter the fluid stream and clog valves and orifices in the transmission and ruin it. Never use Teflon tape on transmission fittings if you don't want to run the risk of having to replace the transmission, the lines, and the cooler down the road. Teflon paste can be sparingly applied to the base of threads if desired.


