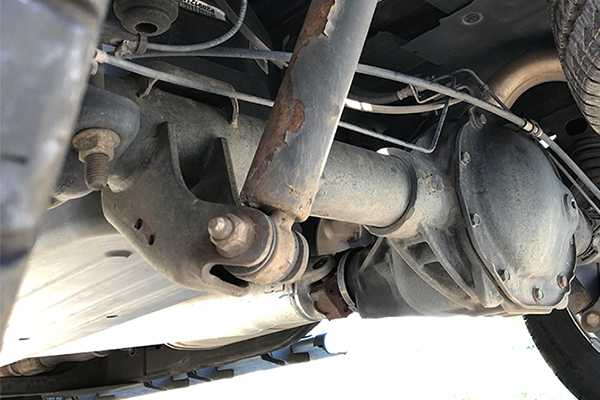
U-joints are a cross-shaped part that connect your vehicle's driveshaft to the transmission and differential and allow for the vehicle's suspension to move up and down without breaking the driveshaft. Over time, especially with improper maintenance, U-joints can fail and require replacement. There are two accepted ways to replace U-joints: with a hammer and with a specialized tool.

You can see the rust on this U-joint, which caused joint failure. This occurs when the joints are lubricated regularly. Source | Mike Aguilar

Source | Mike Aguilar
This is a good project for new DIYers
-
To remove the driveshaft, the car has to be in the air, either level or with the rear higher than the front to keep fluid from leaking out of the transmission. The rear yoke is secured to the differential yoke with either two nuts and bolts or four bolts, depending on year, make, and model of your vehicle. These are usually either 7/16- or 1/2-inch. Once removed, the driveshaft can be removed by pushing it forward and then down and pulling it rearward.

Source | Mike Aguilar
-
Release the tension on the C-clip/snap ring by smacking the yoke with a hammer. Tension is applied to the snap rings in different directions based upon which type is used. Holding the U-joint/yoke assembly by the U-joint cups, sharply strike the yoke. Using a pair of pliers, remove the inside snap ring from the upper half of the yoke or the outside snap ring/C-clip from the lower cup and repeat the process on the other side to remove both C-clips/snap rings.

Source | Mike Aguilar
-
Press the bearing cups out of the yoke. This can be done with a press, a hammer and punch, or heavy-duty socket. Rotate the driveshaft/yoke 180 degrees and repeat on the opposite side.

Source | Mike Aguilar
-
Secure two opposing cups to the new U-joint with a rubber band or tape and remove the two other cups carefully and slide the polished ends of the U-joint into the yoke openings. Place a bearing cup under one of these openings and tap the yoke to seat the cup. Once the cup is seated and straight in the yoke, hammer the yoke home and install the C-clip or snap ring. Repeat on the opposite site.
-
Check the installed U-joint for binding. You may need to "tap" it into place to release this binding.
-
Slide under the car and insert the transmission end of the driveshaft into the tailshaft of the transmission until it bottoms out. Slide to the differential side and raise the tail of the driveshaft into position.
-
Remove the tape or rubber band and set the U-joint cups into the pinion yoke on the differential. Install the U-joint clamps to secure the U-joint to the pinion yoke and tighten the nuts and bolts. Install the C-clips/snap rings to lock these cups into place.
-
Lower the car to the ground, start it up, and listen for any clunking in the driveshaft/U-joints.
-
Mark the side of the driveshaft and yoke that will have the replacement U-joint installed. This ensures that you don't install any imbalance when reinstalling the driveshaft. With the driveshaft out, lay it on a work bench or any convenient and comfortable work surface.
-
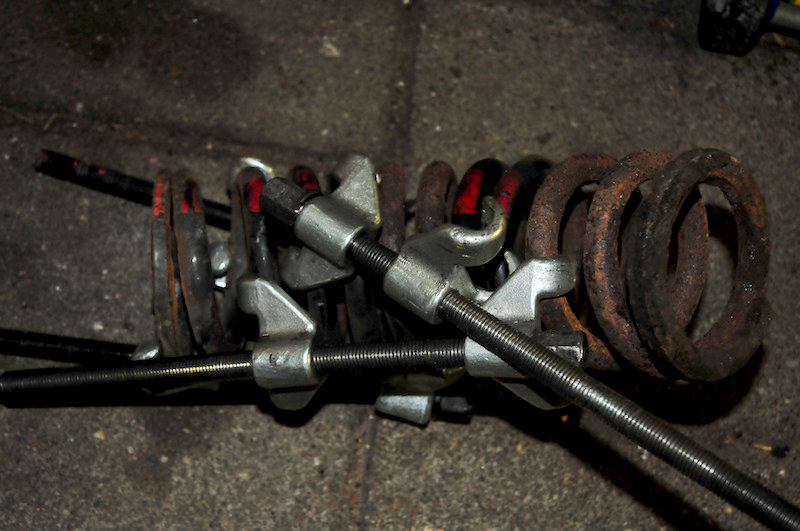
Find the correct size press cup to fit the driveshaft yoke and place the cup over the end of the threaded rod. Next, select another cup that is larger than the cups on the U-joint but not larger than the opening on the yoke. See image above.

Source | Mike Aguilar
-
Place the tool against the yoke and hand tighten the threaded rod. Remove the C-clips/snap rings securing the caps in the yoke. You may need to use the press to remove tension on one clip and then flip it around to remove the other clip.

Source | Mike Aguilar
-
Continue tightening the threaded rod to push one cap out of the yoke. Flip the tool around and repeat to remove the other cap and U-joint "cross." Keeping the cross perpendicular to the yoke can make this process a little easier.

Source | Mike Aguilar
-
Tape (or rubber-band) two opposing caps on the new joint so they can't fall off during installation. Many people consider this unnecessary but change their minds the first time a cap falls off during installation and the needle bearings go all over the shop floor. Tape keeps that from happening.
-
Insert the cross into the yoke. Slide it as far as possible to one side and push the new cap as far into the yoke as you can. Set the tool up to push that cap in with the end of the threaded rod against the cap. (See image below.)

Source | Mike Aguilar
-
Crank down on the threaded rod to drive the cap into the yoke until it seats fully. Remove and flip the tool and repeat on the other side until both caps are properly seated and you can install the C-clips/snap rings to lock them in place. Make sure the joint pivots easily.

Source | Mike Aguilar
-
Back under the vehicle, slide the transmission yoke into the tailshaft until it bottoms out. Lift the rear of the shaft into place and install the straps/bolt the flanges together, making sure to line up the marks you made during removal.

Source | Mike Aguilar

If neighborhood rules prohibit making loud noises, you will need to skip to the next section on using the balljoint/U-joint tool from Advance.
Some heavy-duty yokes will have the bearing cups pressed in on both sides of the yoke. If this is the case for you, repeat steps 2 and 3 above for the second yoke.
During every step of the process, you'll need to be very careful handling the driveshaft. In order to save weight, the driveshaft is fairly light-gauge metal and can dent easily, and a dent in the driveshaft can cause it to be out of balance. If you've got an out-of-balance driveshaft, you're going to have a whole new source of vibration and a new set of problems to address.
Some projects may be too challenging or time consuming to tackle at home, and that’s why we partner with trusted, professional shops that are ready to get you back on the road. Use our directory to find a qualified technician near you.