Source | Mike Aguilar
A properly maintained front-wheel drive (FWD) automatic transmission can last longer than you own your car. However, they can fail, and having a shop do the work can hit you for $2000 or more in labor alone. It'll take a weekend, but with the right tools and advice you can replace your car's transmission at home.
Advance Auto Parts is going to walk through the basic steps to replace a FWD automatic transmission. The repair manual for your vehicle will give you much more detail as well as the torque specifications you'll need during reassembly.
This is a challenging and technical project
- Improper maintenance: Not changing/flushing the fluid and filter when recommended, not maintaining proper fluid level.
- Using the wrong transmission fluid: There are numerous types of automatic transmission fluid on the market. Check either your owner's manual or the repair manual for your specific vehicle to see which yours takes.
- Overheating: Excessive heat will destroy the clutches and bands in the transmission. Overheating can be caused by towing/hauling too much or even sitting in traffic on a hot day, especially if the A/C is running.
- Coasting/sitting in neutral: When the transmission is not in gear the pump isn't being driven and fluid isn't flowing. This causes excess wear and premature failure.
- Contamination of the fluid.
- Place the outer feet as far out as possible, either in the fender or on the strut mounts.
- If the bar wants to tip forward, use the third support arm if you have one. The foot of this arm will rest on the front frame—not on the radiator or anything plastic.
- Use nuts and bolts to secure the chains to the engine. Many engines have hooks for this purpose. If not, look for accessory mounting locations such as the alternator bolts.
- It may take several tries and some fine tuning to get the support bar set up securely. Your patience will pay off in the end, though!
-
Loosen - but don't remove - both front axle nuts with the breaker bar and spindle nut socket. Advance Auto Parts has several different sizes available in loaner tool sets. Also slightly loosen the front wheel lug nuts.
Place a drain pan under the transmission and drain the fluid according to the procedure specific to your vehicle.

Source | Mike Aguilar
-
Usually, the air intake system and the battery are mounted above the transmission, blocking your access. Remove them and set them aside. If you're able to work around the battery, you should still disconnect it.
Notice in the image that the Nissan on the right has the transmission on the driver side while the Honda on the left has it on the passenger side. Both have the transmission buried under a mountain of intake and wiring.

Source | Mike Aguilar
-
Block a rear wheel and lift the vehicle with the jack under the front cross-member. Place jack stands under the frame behind the front wheels and carefully lower the vehicle onto the stands. If you can, raise and support the rear so the vehicle is level, as this makes the job a little easier. Remove the front wheels and axle nuts.

Source | Mike Aguilar
-
If you haven't done so already, support the engine with the support bar from above or the jack with a block of wood from below. Position the jack with the transmission adapter under the transmission for support, and get the tie-down strap ready to go.
-
After supporting both the engine and transmission (and drinking the magic elixir and twisting your wrists into a pretzel) remove the two or three starter bolts and the transmission-to-engine bolts. Some of these are going to be difficult to reach, so you may need extensions or a universal joint socket.
-
Further disconnect the transmission:
- Disconnect the transmission cooler lines at the transmission and allow them to drain into the pan.
- Remove the dipstick if there is one.
- Remove the shifter cable/linkage from the shifter arm on the transmission and remove the shifter cable/linkage bracket.
- Disconnect the various electrical wires going to the transmission, and consider labeling the connectors.

Source | Mike Aguilar
-
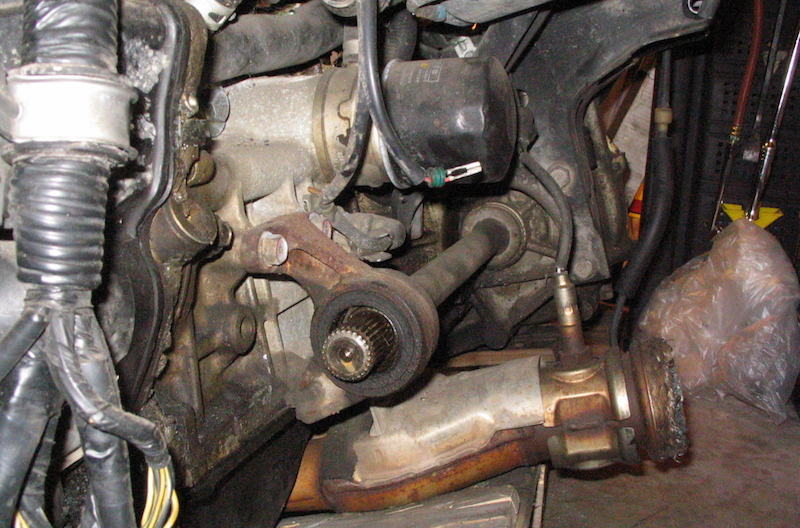
Remove the front axles. This process varies across models, so check out the steps for removal in this tutorial, and then consult your repair manual for any steps specific to your vehicle.
-
Remove the lower bell housing cover plate. Measure how deep the torque converter sits inside the transmission housing, and record it somewhere—you'll need to remember it later on.
Remove the torque converter bolts with a wrench or a ratchet. You may need to use a screwdriver as leverage to keep the engine assembly from rotating while you loosen these bolts. You can also use the screwdriver to turn the engine/transmission to access each of the torque converter bolts. Another option is to turn the engine with a socket on the crank pulley.

Source | Mike Aguilar
-
Secure the tie-down strap around the transmission, and then remove the necessary engine and transmission mounts and mounting bolts.

Source | Mike Aguilar
-
Separate the transmission from the engine, and then remove it. Light prying may be necessary to get it started, but don't pry hard because it's easy to deform the soft metal.
-
Now turn your attention now to the new transmission. You will need to seat the new torque converter properly. To get it seated properly, keep turning while pushing until it clunks into place. Then double check the depth to make sure it's the same as your initial measurement. This is vital to ensure the transmission pump is fully engaged, and will save you the nightmare of accessing it a second time if you didn't seat it properly on the first try.
Compare the old and new transmissions, and transfer any components that did not come assembled on the new one.

Source | Mike Aguilar
-
Raise the replacement transmission into place and - without forcing it - push it into place against the engine. Many transmissions have an alignment pin to give you a first point of contact when you're aligning the transmission to the engine. Install the transmission-to-engine bolts.
Torque all bolts according to specification in your repair manual.
-
Reinstall the torque converter bolts. Then follow the reverse steps from disassembly, making sure that all nuts and bolts are replaced and torqued properly. Keep the transmission supported until the last few bolts are secured. Check again to make sure no bolts were left loose and that no other components like electrical connectors or brackets were overlooked.
-
Install the axle nuts, hang the tires, and run the lug nuts down until they make firm contact with the wheels. Raise the vehicle back off the jack stands and remove them, then lower the jack most of the way. Torque the axle and lug nuts to specification, and then lower and remove the jack.
-
Fill the transmission with the type and quantity of the transmission fluid specified in your vehicle's repair manual. Start the engine and let the transmission warm up. Shift through the gears, allowing the transmission to shift into each gear. Follow the proper procedure to verify the fluid level, and top it off as required. Do not overfill the transmission as leakage and damage can result.

Source | Mike Aguilar
Front wheel drive transmissions are more correctly known as transaxles. We will use 'transmission' throughout this article.

Moveras 47RE Transmission | Advance Auto Parts
Automatic transmissions can fail for a number of reasons. The most common are:

Shift Pro by ETE Automatic Transmission Assembly | Advance Auto Parts

Source | Mike Aguilar
1. You should consult your repair manual to see if any other components are recommended for replacement with the transmission, such as the cooler.
2. Decide whether or not you'll use an engine support bar. They are recommended for supporting the engine during the transmission replacement process, but they're not absolutely necessary. The alternative is to support the engine from below with a jack and block of wood. We recommend using a support bar because they're more stable and pose less of a risk of damaging the engine.
Setting up the engine support bar properly is critical for avoiding damage to your engine and yourself. Exact positioning will vary by vehicle, but the following guidelines should get you going in the right direction:
If you're using a block of wood, you want it to be larger than the oil pan so as not to cause any damage, and avoid the center of the oil pan. Regardless of which method you choose, go slow and check your setup frequently until you're confident you have the engine fully supported.
This job has a lot of steps. Start taking pictures to be used later during reassembly, and keep all of your bolts sorted and labeled — Ziploc bags and marker will make your life much easier. You'd be surprised what you can forget in a day!
Take a minute to step back and check your progress. Make sure that all hoses, cables, linkages, brackets, wires, etc. are disconnected and clear of the transmission.
Performing a fluid flush is recommended at this time, and if any additional work needs is recommended for your specific vehicle, now is a good time to get it done.
Some manufacturers specify that you lubricate the contact surfaces or apply thread sealer to the bolts prior to installation.
Be sure to verify with an Advance Auto Parts associate whether or not the torque converter on the replacement transmission has been pre-filled.
Before returning your old transmission to Advance, place any fluid plugs from the new transmission into the old one to avoid unwanted drips.
Although all this might sound intimidating at first, with the repair manual and the specialty tools you can borrow from Advance Auto Parts, this is a job that you can tackle if you put your mind to it. Also be sure to take advantage of the free used oil recycling program at Advance Auto Parts.
Some projects may be too challenging or time consuming to tackle at home, and that’s why we partner with trusted, professional shops that are ready to get you back on the road. Use our directory to find a qualified technician near you.