Here's how to fix those fuel pump problems.
So your car's been experiencing bad fuel pump symptoms. Sounds like an expensive, time-consuming fix, right? A fuel pump replacement doesn't have to be either of those things. With some care and attention to detail, anyone with fair mechanical proficiency and a set of hand tools can get the job done.
As with any project, be sure you have on hand all of the parts (be sure they're the correct parts!) and tools you'll need for the whole job. That goes double if the car you'll be working on is your main form of transportation. If you get the tank out and realize you need another tool, you'll be left looking for a ride.
Before you get started replacing the pump, be sure to check your tank for any leaks or other damage—since you'll have the tank out anyway, it'll be easy to replace the damaged fuel tank at the same time. Also check to see if your tank has a drain cock or drain plug on the bottom side of the tank. If it does, it'll be easier to get the fuel inside the tank out.
As with most repairs or replacements on an automobile, the cost to replace a fuel pump is less if you do it yourself. So take your time, be patient, and be alert, and everything should go smoothly.
Note: This article covers how to access a fuel pump by lowering the tank. Some vehicles have fuel pump access panels under the rear passenger seat, so be sure to refer to your owner's manual before starting this job to avoid unnecessary work.
This is a project that needs some know-how
-
Disconnect the negative battery cable.
-
With a safe workspace laid out, and your car parked on a level, firm surface, jack it up and place it on jack stands, or use a lift to provide access to the underside of the car.
-
Relieve the fuel system pressure. (How to do this varies between makes and models, so refer to the service manual for your specific vehicle.)
-
Disconnect the filler neck from the fuel tank per your service manual.
-
Support the fuel tank with the jack and the block of wood.
-
Remove the bolts from the straps holding the fuel tank in the vehicle.
-
Carefully disconnect the wiring connections, fuel lines, and vent hoses on the top of the tank before fully lowering the tank.

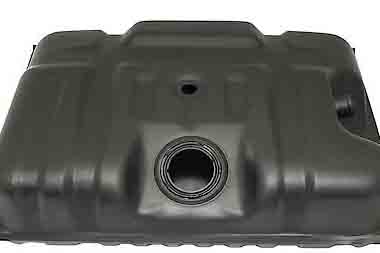
Source | Flickr
-
Once the connections are released, use the jack to carefully lower the tank out of the car.
-
Clean the top of the tank around the existing fuel pump assembly to prevent any dirt or debris from falling into the tank during removal.
-
Refer to your service manual for instructions on removing the fuel pump assembly from the tank. There's typically a plate held in place with screws or bolts, which, once released, enables removal of the pump.
-
Install the new pump in the opposite order you used to remove the old one.
- Reconnect the fuel lines, wiring connections, and vent tubes, and reinstall the fuel tank.
- Reconnect the fuel filler tube.
- Reconnect the negative battery cable.
-
Fill the tank with gas and go for a drive to verify that you've properly replaced the fuel pump and that everything is in proper working order.
First and foremost, remember that you're dealing with gasoline—a highly flammable, dangerous substance. Don't smoke while working on the fuel system and keep all sources of sparks or flame far away from the vehicle and fuel tank during the entire operation. Keep in mind that light bulbs can be very hot, so keep your incandescent shop light on the bench, and use LEDs if you need to work at night.
Also remember that static electricity from your clothes, the vehicle's interior, or other sources can create a spark, and that spark could be deadly. When removing fuel from the tank, be sure to use a hand siphon pump. Don't use an electric pump—there's a risk of a spark causing an explosion.