The leaf spring is a pretty old design—it's a pack of arched steel strips that get progressively longer and are held together with shackles. The pack bows and flexes to absorb the energy of impact with bumps or potholes, and dates back to 19th century stagecoaches and buckboards. Source | Mike Aguilar
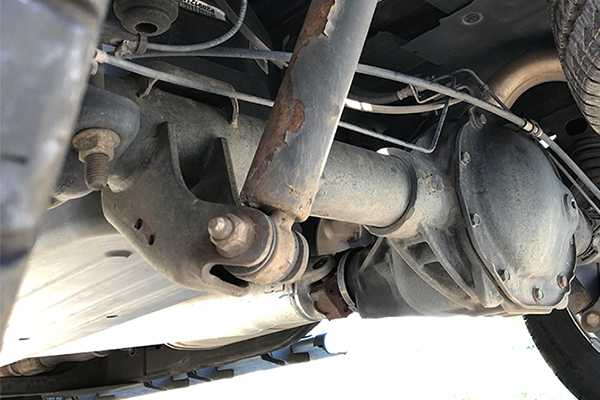
Most vehicles with solid axles have leaf springs that connect the axle assembly to the frame/chassis. Depending on the application, these leaf springs can connect to the frame either directly (the norm for the front mounting point) or with a connector known as a shackle. In older vehicles, these shackles are just plates between the frame and the leaf spring while in others—especially newer vehicles—shackles are stamped pieces and usually replaced as an assembly, although you can install aftermarket bushings in them.
This is a project that needs some know-how
-
Block the front wheels and raise the rear with a jack under the third member, lowering the vehicle onto stands under the frame.
-
Keep the jack under the rear end. Do one end of a single spring at a time, removing the bolt securing the spring into the front pocket and/or the leaf spring and frame bolts on the rear shackle as required. This keeps the rear end properly located.
-
Remove the bolt and lower the jack completely to perform the repair described below.
-
Install the new rear shackle assembly, lower the vehicle, and torque the nuts/bolts to the specification found in the vehicle-specific repair manual for your car. Repeat on the other side.
-
Assemble the Advance Auto Parts loaner suspension press on the leaf spring/shackle with the small end offset and pressing against both the inner and outer sleeves of the bushing but centered on the cup end.

Source | Mike Aguilar
-
Crank down on the press with whatever you've got, whether that be a wrench, socket and ratchet combo, or an impact driver, until the bushing is released. Adjust the position of the press as needed as you go.

Source | Mike Aguilar
-
Clean the inside of the shackle/leaf spring with fine sandpaper or a ball hone on a drill.
-
Using the grease supplied with the kit, lube, and push the two poly bushing halves and inner sleeve into the part. You may need to squeeze it some with the press.

Source | Mike Aguilar
-
Lube and press the OEM replacement bushings into the part by reversing the press used above.

Source | Mike Aguilar
-
Reassemble the rear leaf spring/shackle assembly using the jack under the axle housing to raise or lower the housing as necessary to insert and tighten the bolt.
-
Lower the jack completely to load the suspension. Torque the bolt(s) to the specification in the vehicle-specific repair manual for your vehicle.
-
Go back to Step 3 and repeat Steps 4 to 9 as required to finish the job.
-
Remove the stands and lower the vehicle. Double-check the torque on the leaf spring and shackle bolts. It's a good idea to recheck torque after about 200-250 miles.

Source | Mike Aguilar

Broken shackles can lead to this condition. The rear shackle on a 2010 Silverado punched right through the bed. Source | Mike Aguilar
Without bushings in your suspension, the ride would be hard enough to vibrate fillings loose on the best of roads. Over time, this absorption of energy would cause these bushings to break down and often deform. This can cause abnormal and excessive tire and drivetrain wear, as well as a thumping sound as you drive down the road. Replacing the leaf spring shackles in newer vehicles or replacing the bushings within those shackles with OEM rubber or polyurethane bushings will restore your original ride quality. Polyurethane (poly) bushings are a little more expensive but will last longer than OEM rubber bushings.
If the shackles are in good shape, just the bushings need to be replaced, and there are several ways to do this. Back when I was a kid, my dad taught me to replace leaf spring bushings using a suspension press and an impact gun to do the pressing. Next, I learned to drill the rubber portion out and use a big hammer and chisel to remove the old bushing piece by piece. Later, I learned how to use an air hammer to remove them even quicker. But to this day, I still prefer using a suspension press because it's usually quicker and I don't need an air compressor. I'm going to describe here how to replace leaf spring bushings using a suspension press and impact gun/driver. If you don't have an impact gun/driver, you can use a socket or wrench, although it will take longer.
Another way to get the job done is to replace the shackles and bushings as an assembly. This is necessary in cases where age or rust have made the integrity of the shackles questionable. This is also true of most late-model vehicles where the shackles are consumable parts, like brake pads and shock absorbers. If you do purchase a leaf spring shackle kit, make sure it comes with new Grade 10 (minimum) bolts. If not, I recommend you purchase them. Some leaf spring bushing replacement kits either don't come with new nuts and bolts or the bolts they do come with are at best Grade 8. The vehicle that only goes to the store and back might get away with Grade 8, but not a daily driver. These bolts see a lot of force and stress and really need to be hardened steel that won't fail.


