A failing upper or lower control arm isn't a repair you want to ignore, simply because the control arms help connect the vehicle's wheels to its frame. If one fails while you're driving, it can result in a very dangerous situation.
Control arms are subject to a harsh environment, too, absorbing much of the shock from the road and allowing the suspension to move up and down while holding other vehicle components firmly in place. When they need to be replaced, it's usually because the arm's bushing or ball joint has simply worn out.

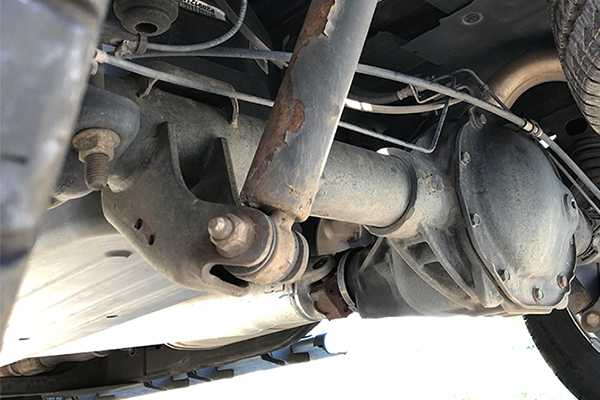
Any control arm is dangerous if it breaks, like this lower control arm. Source | Rebecca Brown | Creative Commons
While there are many different types of control arms, depending on the vehicle age and type of suspension, this article looks specifically at an upper control arm and bushing assembly in an "A" shape (hence the informal term "A-arms") – a popular style found on many newer vehicles, particularly trucks and SUVs. Signs that a control arm – or more specifically its ball joint – may be failing and needs to be replaced include:
- Clunking sounds from the front or rear axle when you hit a bump or pothole
- Steering wheel pulling or wandering to either side
- Vibration in the steering wheel
- Too much movement in the wheel or a “wobbly" wheel when it's jacked up and off the ground
- The wheel makes a "clunking" sound. With the wheel raised off the ground, place something that will give you leverage — such as a 2x4 — under the wheel at the 6 o'clock position. Use the leverage to move the wheel up and down — a clunking sound indicates a bad control arm.
Here's how to replace an upper control arm.
This is a project that needs some know-how
-
Park the vehicle on a flat, level surface. Set the parking brake. Block the wheels on the end opposite where you're working (i.e. if you're working on a front wheel, block the rear wheels.)
-
Using the ratchet and socket, loosen the lug nuts – but don't remove them – on the wheel you'll be working on. You may have to use the breaker bar to loosen the nuts.
-
Consult the vehicle owner's manual to determine the proper location to position the floor jack under the vehicle. Then jack the vehicle up and secure it by placing the jack stands underneath so that they make contact with the vehicle's frame, lowering the vehicle slightly so that it settles onto the jack stands.
-
Finish removing the loosened lug nuts and the wheel and set them to the side.
-
Using penetrating oil, spray the control arm's nuts and bolts, and the bolt and nut securing the ball joint to the knuckle.
-
Remove the nut/hardware from the control arm's ball joint to separate it from the knuckle. If your vehicle's control arm doesn't contain a ball joint, it's a good idea to conduct a thorough inspection of the condition of any separate ball joints and other related parts so you don't have to come back and work on these parts after this job is completed.
-
Gently tap on the end of the bolt if needed to remove it.
-
Use a ball joint separator or the pry bar to remove the ball joint from the knuckle.
-
On either side of the control arm there are two bolts and nuts securing it to the cradle or body. Remove the nuts. On many vehicles, there may not be enough clearance for a ratchet and socket so use a box wrench instead.
-
Remove the bolts, then pull the control arm out, separating it from the vehicle.
-
Compare the new control arm with the old one to ensure they are a match.
-
Install the new control arm into the brackets or cradle.
-
Insert the two bolts securing the control arm to the vehicle, then install the nuts, hand tightening them for now.
-
Position the ball joint to fit into the knuckle. It may help to jack up the knuckle slightly, making it easier for the ball joint to be seated into the knuckle. If necessary, tap the ball joint with the rubber mallet to coax it into place.
-
Insert the new nut/hardware. Torque the three nuts to specifications using the torque wrench. Don't reuse the old cotter pins. When tightening the castle nut to torque specifications, if the hole for the cotter pin is blocked by the castle nut, tighten the castle nut enough to provide clearance, instead of loosening the nut.
-
Put the wheel back on, hand-tighten the lug nuts, lower the vehicle to the ground, and then torque the lug nuts before taking the vehicle for a test drive on your way to getting an alignment.
Schedule an alignment as your vehicle will probably need one after performing this job. If you don't have a trusted repair shop, use our directory to locate a professional, qualified technician near you.
Never jack up the vehicle under the transmission pan or oil pan. Remember to chock the wheels that are still on the ground.